197
I was thinking recently about the way I work on design problems. There are about as many ways of approaching and dealing with design problems as there are people who wrestle with them. Because of that, I have always felt that the usual tutorial style writeup people do of their work flow and habits was at best overly simplistic, and at worst blind to alternate solutions. For far too many people the contents of tutorials are taken as the definitive way to solve a problem or use a tool. I can think of few things more counterproductive than telling a creative person a definitive way to do something. As is my general policy, I will not do a tutorial. If anything I write is useful to you in your own work, we can call that a happy side effect.
My own method, and as prescribed above I invite you to ignore in favor of yours, is often to work backward. Or outward, or inward, or occasionally sideways. When a design problem comes up, there is often one clear and obvious way to tackle it, but I often find that looking at it from another angle can lead to better solutions. I’ll attempt to explain by describing a project I worked on a few years ago.
I used to design and build signs. Many of the signs were already designed in the creative sense. That is, someone had designed the look and general aesthetic of the sign, and the task then for we, the sign manufacturing folk, was to figure out how to assemble that sign. Occasionally that was very simple and straightforward, for something standardized like a traffic sign. Other times it could be aggressively complex incorporating many materials, manufacturing methods, and specialized skills. I’m not going to write about any of those. I’m going to write about a measuring stick.
Quite a few different sizes and shapes make up the wonderful world of traffic signs. Most of them are standardized to fit on the same poles and brackets. The holes are a set distance from the center of these signs, and a measuring tape is the most complex tool you would probably need to mark where those holes go. Of course, people being people, not all types of signs match that standard. Some have holes that are set wider or in a different pattern than straight up the center. Some holes need to be drilled vertical to the ground, some are horizontal to the ground, and some need to be drilled in both vertical and horizontal like a T or H shape. Rather than attempt to measure each one of the dozens and dozens of signs that are manufactured constantly, someone a long time ago decided that it would be more efficient to create some templates that you could simply lay over the sign you were marking for holes. You would lay the correct template down and mark the spots where the holes would go with a sharpie or a grease pencil. When you needed to mark another type of sign, you would go to the pile of templates, gather up the one that you needed, and make your marks. It was a pretty good system, and I couldn’t really see any way to improve it.
As with all tools, the templates had started to wear out. One of them had been broken and welded back together so it no longer laid perfectly flat. They were all made of pretty heavy steel, and some of them were U channel bars, so they were much thicker than a template really needs to be. The templates were in use long before I worked there, but their time had come, and since I operated the metal cutting router machine, I was tasked with replacing some of them.
The first, simplest, solution was, of course, to replace the damaged ones with lighter aluminum versions and move on with life. Both the guy who was in charge of the templates and myself weren’t really satisfied with that. There were a few templates that could easily be combined into one with some simple design work, so why not do away with the redundant templates, even the ones that were in good condition, to reduce the amount of different measuring tools in that pile. I drew that up in whatever vector program was handy, likely illustrator but I really can’t recall, and it was quickly apparent that we could fit a few more of the templates into this design. We did that, and figured we were done. There were a couple more large H shaped templates, but adding those to the design of this new template would make the whole thing unreasonably large and heavy, sort of defeating the whole point of recreating the templates in the first place.
I got to work creating the one, roughly rectangular, template, and the several outlier versions that would become slightly lighter and less massive after the redesign, but only slightly. That should have been it. Replace the old tools with new tools that, with the exception of a few, would be roughly the same. The pile would go from 5 or 6 different templates to 3 or 4, but you would still need to measure several of the sign blanks and mark the center so that the template would line up properly. That’s when I started to look at the problem from the inside out rather than just base my work on what already existed.
Working from the inside out, I came up with an idea for a cross shaped template, rather than one that matched the perimeter of the standard signs. Since the holes ran up the centers of the signs, you really only needed the center of the template. The rest of the material was superfluous. I set out creating a plus sign a few feet across that had stepped sides. The different steps would line up with the different sign dimensions so you would never have to measure to find the center. Lining up the steps to the edge of the blank piece of aluminum with your fingers would be enough. All but the H shaped brackets could be included in this design and it would massively simplify the templates pile. It wasn’t very far into the design process that we realized that only the location of the holes was important in the H shaped template. Adding a ring with holes at the appropriate points to the cross shaped template wouldn’t add much weight, and it would maintain roughly the same dimensions. The ring also worked as a nice carrying handle when you needed to move the template from place to place.
I cut one out on the router and it worked pretty well. Actually, it worked so well that the department that actually goes out and installs the signs onto signposts snagged it for their trucks. Rather than cart around the several templates that they had, they could carry this one light and durable template for any sign they need to install or repair. I made another for the sign shop, incorporating some tweaks that we had come up with, and someone else created a color coded chart and stickers for the template. Now if someone was operating the hole punch and was unsure what set of holes was for what type of sign, they could simply consult the chart displayed above the templates storage location.
All in all, it wasn’t a particularly sophisticated solution to a design problem. It didn’t take a lot of engineering or complex math. I think the end result is pleasing to look at, but only because the tool excels at its one job, showing you where to make holes.
I’m not sure if they have made more of them for the folks on the installation trucks, or made changes to the design to refine and add to it, but I was happy that it worked. Rather than just replace what existed with slightly improved versions, looking at the problem in another way resulted in a better functioning and simplified tool. Whenever I am faced with a problem that seems like the solution might be a bit clunky, I always remember that measuring stick, and how working the problem from the inside out made for a better product.
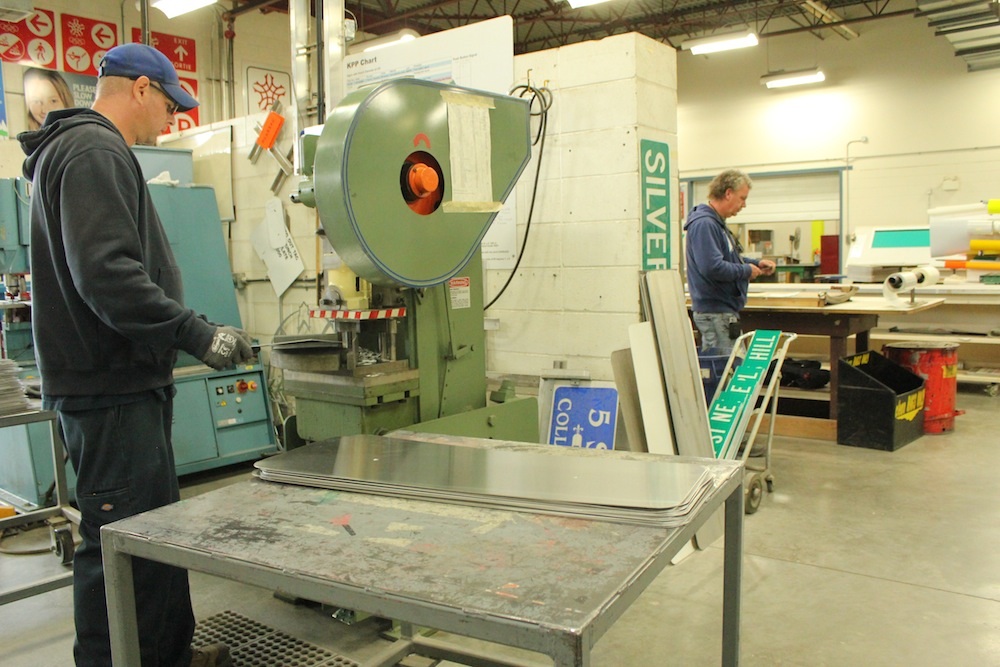
The template can be seen leaning against the wall behind the metal punch. The color coded chart (KPP Chart) is on the wall above.
This post is licensed under CC BY 4.0 by the author.